
Building Angular templates with Razor

ASP.NET MVC is an opensource framework, created by Microsoft, for developing next generation web applications, with focus on the server-side logic. ASP.NET MVC embraces a patterns-based way to build extensible and maintainable applications while enabling a clean separation of concerns. For the client-side, it relies by default on jQuery, in order to enable some interactive features and also improve the user’s overall experience.
It’s true that jQuery has been playing a major role in the development of web applications over the past years, mostly because it is easy to learn, plus it supports a consistent syntax across different browsers. The problem is that jQuery code is practically impossible to test, hard to extend, and most importantly, hard to maintain.
On the other hand, browsers have evolved into powerful programmable platforms, enabling applications to deliver highly interactive, seamless experiences. Given the significant shift of functionality from the server to the client, developing for the browser has become more important than ever. Unfortunately, jQuery’s shortcomings make this challenge harder to tackle.
Introducing Angular
Angular is a opensource JavaScript framework, maintained by Google, designed for building dynamic web applications. Angular uses pure HTML as its template language, but allows us to extend HTML’s syntax and combine it with functionality in order to build higher-level components.
Moreover, it supports patterns such as dependency injection (DI) and data binding, which eliminate the need for much of the code we otherwise have to write, and enable us to write automated tests for our applications, or even practice test-driven development (TDD).
A major difference between jQuery and Angular is that in jQuery we consume HTML through JavaScript code, whereas in Angular we mostly consume JavaScript code through HTML.
Getting the best of both worlds
Blending two full-blown frameworks can lead to some truly impressive results, although there are a few challenges to be aware of, such as overlapping features (e.g. routing) and lack of native Angular support by ASP.NET MVC (e.g. Razor helpers). Its up to us to strike a balance between the frameworks and use exactly what we need from each one, depending on the specific project, its requirements and constraints. Over the next few blog posts I will be documenting a number of strategies on how to get the best of both worlds.
Building Angular Templates with Razor
Razor is ASP.NET MVC’s default templating engine. We can think of a Razor template as HTML augmented with C# code. This feature gives us a number of benefits, such as having strongly-typed models in HTML forms, building HTML using parameterized Razor helper functions, and much more. Let’s see it in action.
The full code from this post can be found on GitHub.
Setting up the project
First thing to do is create a new project in Visual Studio. We’ll choose ASP.NET Web Application, set the name as AspnetMvcAngular.Web
and choose the MVC template. We’ll also install the AngularJS.Core package from NuGet, and wire up Angular within our main layout file,
Views/Shared/_Layout.cshtml.
We’ll adjust the <html> tag,
<html ng-app="app">
insert a <base> tag within <head>,
<head>
    <base href="/">
    ...
</head>
and also we’ll add a reference to angular.js at the end of the file, before the closing </body> tag.
    ...
    <script src="~/Scripts/angular.js"></script>
</body>
Serving Razor views
Now that we’ve set up Angular, we’re ready to configure ASP.NET to serve Razor partial views, and consume those views in Angular.
We will first create a folder called app at the project’s root folder. This folder will contain our Angular application’s .js files
and .cshtml templates.
Next, we will locate a file called Web.config which resides in the Views folder, and drop a copy of it into the newly-created app folder.
Before proceeding any further, we’ll have to open app/Web.config, locate the following element:
<add name="BlockViewHandler" path="*" verb="*" preCondition="integratedMode" type="System.Web.HttpNotFoundHandler" />
and change the value of the path attribute from "*" to "*.cshtml". This setting blocks any direct web requests towards .cshtml
files, but allows all other file types to be served statically.
Essentially, we need Razor files to be rendered through a controller, otherwise the C# code contained in them won’t kick in. In this example,
we will create a dedicated controller called AngularTemplateController, with a single action called RenderView, to take care of rendering:
using System.Web.Mvc;

namespace AspnetMvcAngular.Web.Controllers
{
    public class AngularTemplateController : Controller
    {
        public PartialViewResult RenderView(string name) {
            return PartialView($"~/app/templates/{name}");
        }
    }
}
Finally, we’ll define a new ASP.NET MVC route for reaching that controller. We’ll open RouteConfig.cs, located in the App_Start folder,
and add the following route definition before the Default route:
routes.MapRoute(
    name: "Angular Templates",
    url: "templates/{name}",
    defaults: new { controller = "AngularTemplate", action = "RenderView" }
);
That’s it! All we need to do now is test-drive the feature.
Creating an Angular template with Razor
As a simple example, we will create a standard login form. We will demonstrate the usage of an actual C# model, and we will build our
HTML using Razor helpers. As an extra kick, we will also print the current time at the bottom, using C#’s DateTime class.
The model we’ll use is called LoginViewModel, and it’s automatically created as part of Visual Studio’s MVC template. We don’t need
to add any extra code, but just for the sake of completeness, here is the class definition:
public class LoginViewModel
{
    [Required]
    [Display(Name = "Email")]
    [EmailAddress]
    public string Email { get; set; }

    [Required]
    [DataType(DataType.Password)]
    [Display(Name = "Password")]
    public string Password { get; set; }

    [Display(Name = "Remember me?")]
    public bool RememberMe { get; set; }
}
Next, we will create a file called login.cshtml within the app folder. We need to make sure that in the file properties, the Build Action
is set to Content. Here is the template’s definition:
@model AspnetMvcAngular.Web.Models.LoginViewModel

<form name="vm.loginForm" ng-submit="vm.loginForm.$valid && vm.submit()">
    <div class="form-group">
        @Html.LabelFor(m => m.Email, new { @class = "col-md-2 control-label" })
        <div class="col-md-10">
            @Html.TextBoxFor(m => m.Email, new { @class = "form-control", ng_model = "vm.model.email" })
        </div>
    </div>
    <div class="form-group">
        @Html.LabelFor(m => m.Password, new { @class = "col-md-2 control-label" })
        <div class="col-md-10">
            @Html.PasswordFor(m => m.Password, new { @class = "form-control", ng_model = "vm.model.password" })
        </div>
    </div>
    <div class="form-group">
        <div class="col-md-offset-2 col-md-10">
            <div class="checkbox">
                @Html.CheckBoxFor(m => m.RememberMe, new { ng_model = "vm.model.rememberMe" })
                @Html.LabelFor(mc => m.RememberMe)
            </div>
        </div>
    </div>
    <div class="form-group">
        <div class="col-md-offset-2 col-md-10">
            <input type="submit" value="Log in" class="btn btn-default" />
        </div>
    </div>
</form>

<p>Rendered at: @DateTime.Now.ToShortTimeString()</p>
What’s great about this technique is that we are perfectly free to mix Angular directives, such as ng-submit, with Razor helpers,
such as @Html.TextBoxFor.
Note: Razor helpers accept HTML attributes in the form of anonymous C# class properties. C# class property names cannot include a hyphen (-),
so as a convention we add an underscore (_) instead, and Razor converts them to hyphens during rendering. Therefore, ng_model="vm.model.email"
is converted to ng-model="vm.model.email".
Now we’ll have to create a very simple angular application to handle our form. We will create a file called app.js within our app folder,
containing the following code:
(function (angular) {
    'use strict';

    angular
        .module('app', [])
        .controller('homeCtrl', function () {
            var vm = this;

            vm.submit = function() {
                alert('Hello from angular, form submitted.');
            };
        });

})(angular);
We’ll have to add a reference to this file within our main layout file (Shared/_Layout.cshtml), right below the angular.js reference, like so:
    ...
    <script src="~/Scripts/angular.js"></script>
    <script src="~/app/app.js"></script>
</body>
Finally, it’s time to actually use our new feature. In Index.cshtml page, which is located in Views/Home, we will use Angular’s ng-include
directive to load our form template:
@{
ViewBag.Title = "Home Page";
}
<div ng-controller="homeCtrl as vm">
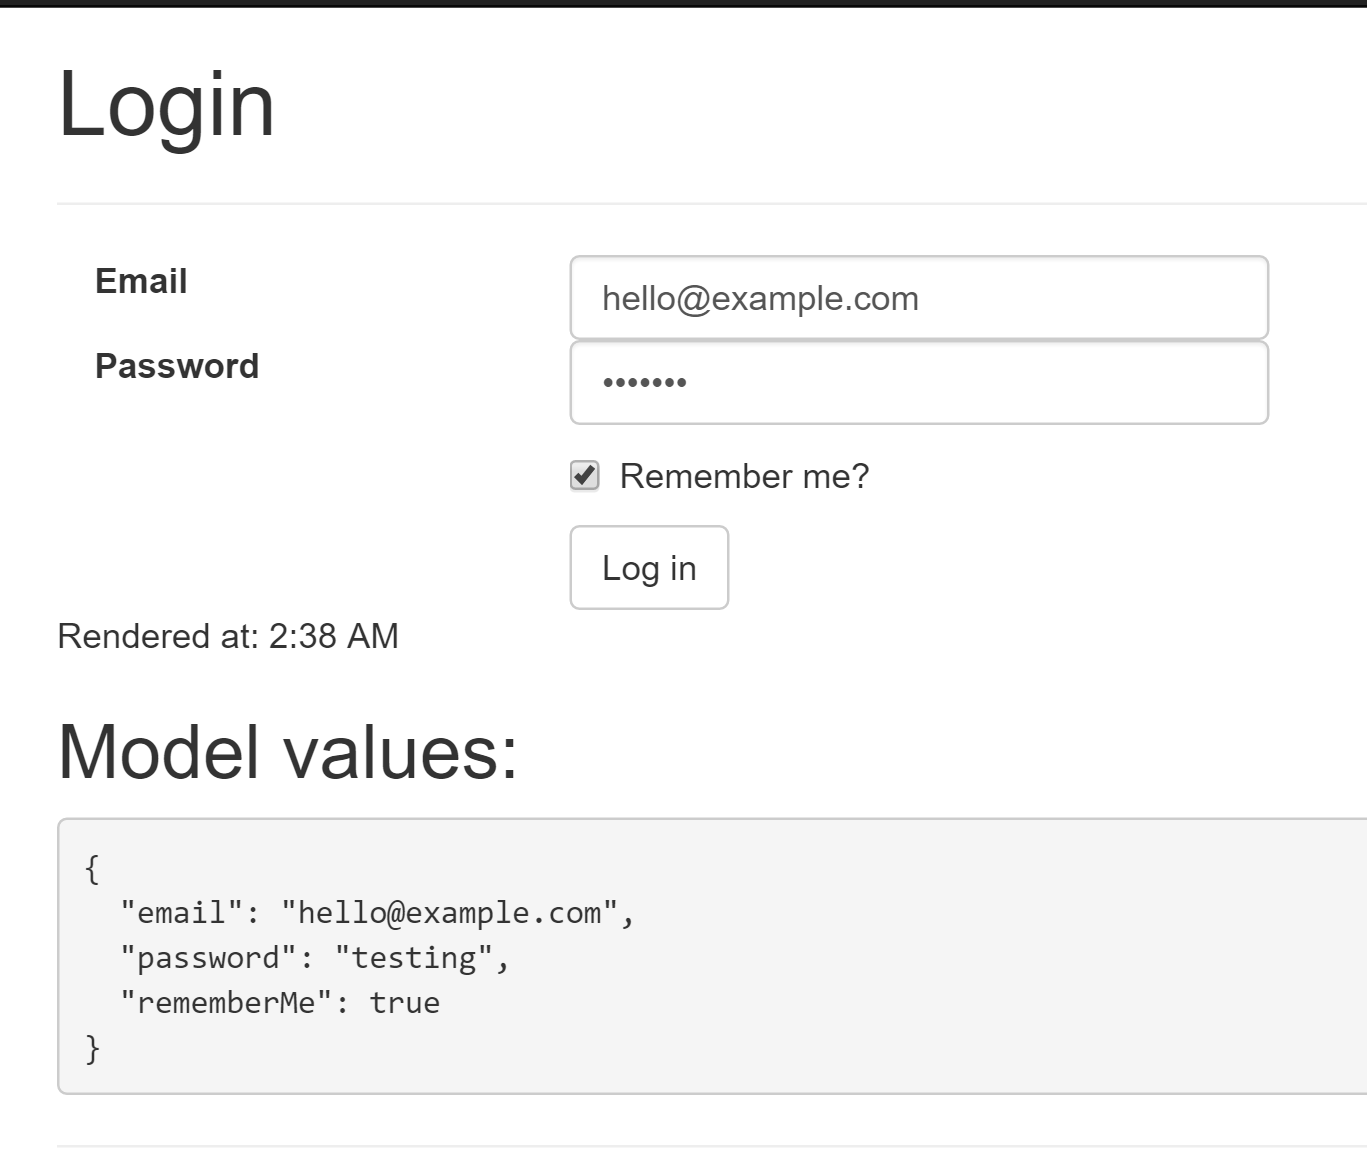
<h1>Login</h1>
<div ng-include="'templates/login.cshtml'"></div>
<h2>Model values:</h2>
<pre></pre>
</div>
We can now run the application. Here is the final result:

Benefits
As previously mentioned, building templates in a strongly-typed fashion can save us much time and frustration. The most common scenario is changing a C# model class property name, where the template will be automatically be updated thanks to dynamic tag generation through Razor helpers. Furthermore, we have full access to ASP.NET MVC’s model metadata, giving us the opportunity to use verfy advanced features like reflection. Sky is the limit.
Considerations
You might have noticed that in this example, form validation doesn’t work, and that’s expected. ASP.NET MVC by default supports a feature called jQuery unobtrusive validation, and there’s no equivalent feature for Angular out of the box. We can either add the appropriate Angular directives manually, or build that feature ourselves using Razor helpers. In fact, that’s something that deserves a post on its own.
Until then, share your thoughts in the comments section below, and stay tuned!
Become a DrinkBird Insider
Never miss a post! Get the latest articles on tech and leadership delivered to your inbox. Sign Me Up Sent sparingly. Your privacy is a priority. Opt-out anytime.